

Summary
Step 1: Design your dressing room project
Step 2: Gather the materials and transfer the layouts to the wall
Step 3: Attach the dressing room frame
Step 4: Install the shelves
Step 5: Install the closet rods
Step 6: Design your dressing room
Making a dressing room in a bedroom will allow you to optimize the storage space. It is an attractive and more functional alternative to traditional chests of drawers and cupboards. By making your dressing room, you will get a custom-made storage space designed according to your needs and desires. Before you start designing and manufacturing your dressing room, it is necessary to prepare your project.
This post provides useful advice and explanations to make a dressing room.
Checklist of materials you will need:
| Dowels | Starting at $1 per $25 |
| Mounting bracket | $4,00 |
| Tape measure | Starting at $4 |
| Paper + pencil | Already owned |
| Drilling machine | Starting at $30 |
| Saw egoïne | Starting at $3 |
| Jig Saw | Starting at $30 |
| Screwdriver | Starting at $30 |
Step 1. Design your dressing room project
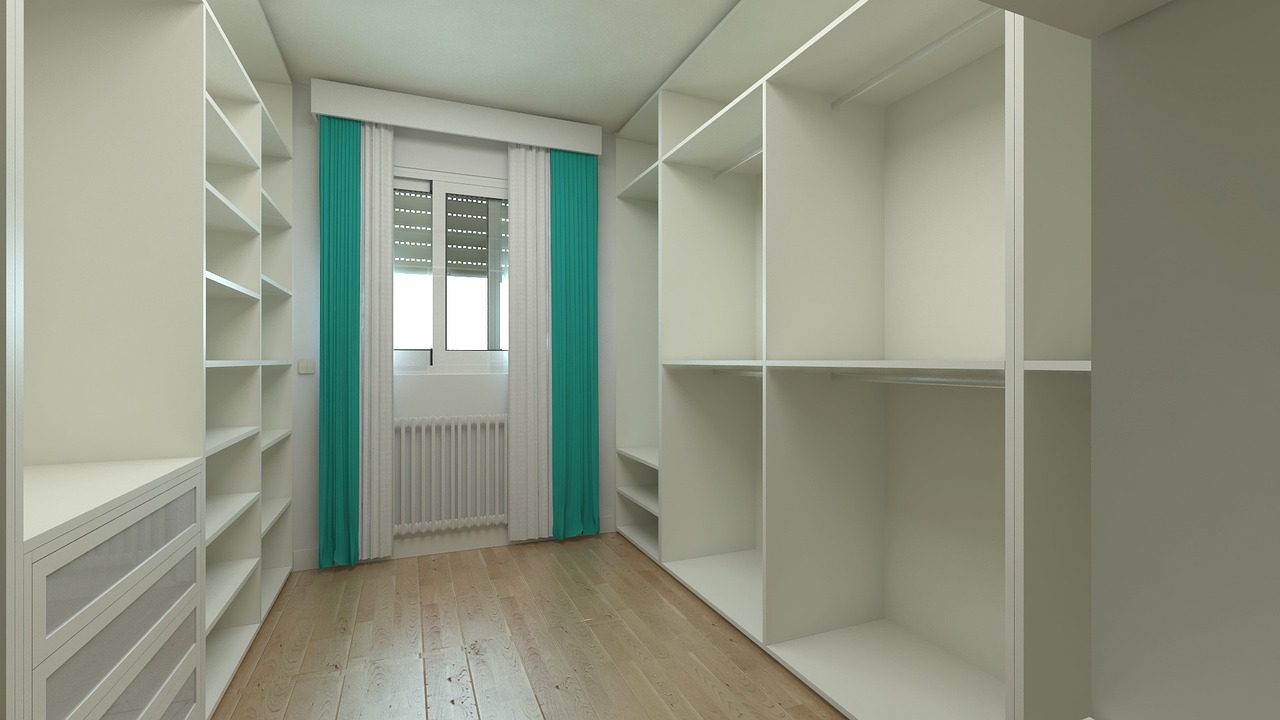
First of all, it is necessary to evaluate the surface available to make your dressing room. A dressing room can be closed or open.
Case 1: you have the space needed to make a closed dressing room
The minimum surface is 4 to 6 m² in a room dedicated to the dressing room.
You can choose between several configurations:
-
- A configuration in “I” is perfectly adapted to small rooms. The dressing room is arranged on a single wall.
-
- Configuration in “II” is ideal for wide but shallow rooms. The two opposite walls are arranged.
-
- L-shaped configuration, for a deep room with a small width. One of the sidewalls and the back wall are arranged.
-
- U configuration is perfect for large rooms. Space is arranged to the maximum.
Case 2: space is reduced, and the dressing room is open to a room
If the space dedicated to the dressing room is less than 4 m², all the available surfaces must be used and optimized. A small, well-organized space will provide you with a real storage area.
You can opt for:
-
- a hidden space with sliding doors or curtains.
-
- an open space that is organized and tidy to facilitate choosing your clothes at a glance.
Draw a plan of your dressing room
-
- Take measurements of the space available for your dressing room and draw a plan based on these recommendations:
-
- The dressing room’s depth must be between 50 and 55 cm if you install a rod with hangers.
-
- A rod must be installed at:
-
-
- 1.60 m from the floor for dresses and coats;
-
-
-
- 80 to 100 cm for skirts and pants.
-
-
- The depth of the shelves should be between 35 and 40 cm for better visibility.
-
- The space between the shelves must be 30 cm.
The bottom of the dressing room can be used to store shoes. Several solutions are available: lockers, shelves, or shoe storage.
Once your project and your choices are well defined, you can start building and fitting out your dressing room.
Step 2. Gather the materials and mark out the layouts on the wall.
To make a dressing room, here is the list of materials you will need:
-
- 3 large boards of wood or medium to make the frame;
-
- wood or medium boards for the shelves;
-
- wooden cleats;
-
- one or more rods;
-
- brackets for the rods.
Once the materials are assembled, the dressing room layouts should be transferred to the wall:
-
- Use a ruler or a wooden strip to trace the contours of the dressing room.
-
- According to the dressing room plan, trace the locations of the shelves and rods.
Tip:
-
- Take into account the thickness of the boards when transferring the lines on the wall. For example, for a spacing of 30 cm between the shelves, the lines will be drawn every 32 cm.
-
- Depending on the dimensions of your dressing room, the planks must now be cut. You have to cut the boards and transfer the measurements to the wooden or medium planks.
-
- Use a jigsaw to get a more precise cut.
Step 3. Fix the dressing room frame
-
- Attach the sideboards
-
- Start by fixing the dressing room frame on wooden rails screwed to the floor and ceiling:
-
- Depending on the width of the boards, cut 4 wooden strips that will act as rails.
-
- Screw the first rail to the floor by positioning it perpendicular to the wall line.
Necessary: use screws adapted to the nature of your floor.
– Attach the second rail to the ceiling, also aligning it with the wall line.
– Position the board against the outside field of the 2 cleats and screw it on.
– Do the same with the other board.
– Attach the central board
– Use the same floor and ceiling tracks to attach the centerboard to serve as the “backbone” of your dressing room.
Note: this board does not have to be in the center. Its position is to be determined according to the plans of the storage spaces. There can also be 2 central boards depending on the size of the dressing room.
Step 4. Install the shelves
– Using the same fastening method with cleats, you can install the storage shelves in your dressing room.
– According to the dressing room layout, position, and fasten wood strips of the correct dimensions on the sides, aligning with the configurations made in step 2.
– For greater strength, you can attach an additional strip to the back wall.
Tip: If you are attaching a cleat to the back wall, measure the space between the 2 side cleats precisely.
– Install your shelves by resting them on the cleats.
– You can strengthen the fixation by screwing them on the cleats.
Note: this option will not allow you to adjust the storage space when needed.
Step 5. Install the closet rods.
– Choose sliding rods to avoid having to cut closet rods to size.
– Position the rod in the desired location.
– Check its horizontality with a spirit level.
– Use a pencil to mark the locations of the mounting brackets.
– Locate the mounting holes and screw the brackets to the walls of the closet.
– Install the rod on its brackets.
Step 6. Arrange your dressing room
As per your desires, there are many possibilities of arrangement. You can:
-
- Make custom-made drawers.
-
- Install lockers or storage boxes.
-
- Install curtains.
-
- Install lighting in your dressing room.
That’s it. You are now done with making your dressing room. Please, remember to share your comments in the section below.
Leave a Reply